
We are all taking and sharing more photos than ever. In this era of digital photography freedom, how can your photos truly stand out against the rest? Here are my top ten iPhone photography workshop tips to enhance your photography skills:
1. Clean The Lens.
My least technical tip but believe me it's one of the most important.
Dust, fingerprints, and smudges on our smartphone camera lens can significantly impact the clarity of our photos. A quick clean is a simple, yet effective, way to maintain optimal image quality, prevent blurriness, ensure accurate colours, enhance low-light performance, and contribute to the long-term health of your device.
Use a soft, microfibre cloth, like the ones used for spectacles. They’re gentle and won't scratch the lens.
2. Fine-Tune Camera Settings.
Although the Camera app offers numerous features, certain settings can only be accessed or adjusted according to individual preferences through the Settings app.
I’m using iOS 17 on a iPhone 15 Pro Max, some settings may be different to what is available on your device, depending on age and the level of system software.
Go to Settings > Camera
Formats: The latest iPhones offer various format choices for quality, resolution, and compatibility of the camera capture. IOS 17 introduces max resolution photos for 48MP main cameras.
Camera Capture: Choose either HEIF (High Efficiency Image Format) or JPEG. HEIF generally provides better image quality at smaller file sizes, however JPEG is more widely supported. I use HEIF.
Photo Mode: On iPhone 15 models, the Main camera resolution is set to 24 MP by default. You can switch between 12 MP, 24 MP. A photo will be approximately 2MB at 12 MP or 3 MB at 24 MP. I use 24 MP.
Enable ProRAW: If you have an iPhone 12 Pro or later Pro iPhone you can capture a RAW image from the Camera app. turn on 'Resolution Control' or 'ProRAW & Resolution Control' (depending on your model).
A ProRAW image is an original image captured from the sensor on the iPhone with minimal processing. This provides much more detail and allows more flexibility in editing.
On iPhone 15 Pro and iPhone 15 Pro Max, you can choose the default format after you turn on 'ProRAW & Resolution Control'; tap 'Pro Default', then choose an option.
With HEIF Max, users can capture photos in 48-megapixel resolution and save them in a compressed file, taking up much less storage than a ProRAW image.
Preserve Settings: Do you have favourite camera settings on your iPhone? It's annoying and time consuming to have to select them every time you open the Camera app. Fortunately, you can save the last Camera Mode, Filter, Exposure, Depth, and Live Photo settings you used, so they’re not reset when you next open the Camera app.
I opt for having 'Exposure Adjustment' turned on. This way, if I'm taking lots of pictures in similar light, I don't have to worry about losing my preferred exposure when I exit the Camera app.This setting adds an exposure adjustment indicator to my camera app screen which shows the current exposure adjustment, plus (+) values brighten the image, minus (-) values darken it. Tap the indicator to adjust your Exposure Level which appears in the tool bar.
Use Volume Up for Burst: You can capture a burst of photos (up to 10 photos per second) using your iPhone's Camera app. On the iPhone XS, iPhone 11, or later, slide and hold the Shutter Button to the left. For older models like the iPhone X, a prolonged tap on the Shutter button does the trick. Both the rear and front-facing cameras support burst photography.
I prefer using the Volume Up button on my iPhone for quick burst shots. With this setup, a continuous press on the Volume Up button captures burst shots, and a counter in the centre shows the number of photos taken. Release the button when you've got enough or captured the shots you want. This applies to all iPhone models.
To view and select your Burst Mode images, go to the Photos app and tap Albums > Media Types > Bursts. Open the burst you want to view. Tap 'Select'. Swipe left and right to see each photos in the burst. Select the ones you want to keep and tap 'Done'. These selected photos will then be saved into your 'Recents album' as separate images.Tap 'Keep Only (X) Favourites' to save only the pics you selected, or 'Keep Everything' to keep all the shots captured in the burst. Be aware that saving all shots in all bursts will impact on your device storage.
Shoot Portraits in Photo Mode: With iPhone 15, iPhone 15 Plus, iPhone 15 Pro, and iPhone 15 Pro Max you can take a regular photo, and Camera will automatically capture depth information when it detects a person or a pet in the frame. That way, you can turn it into a Portrait after you’ve taken the shot.
Turn on the Grid: Using Grid Lines while taking shots can assist in the framing of your photos, ensuring level horizons, and helping to apply the rule of thirds effectively. The rule of thirds in photography entails positioning the subject in either the left, right, top or bottom third of the image, leaving the rest of the frame more open. It divides the photo into nine equal parts with two evenly spaced horizontal and vertical lines. This guideline often results in engaging and well-composed photos.
Enable the Level: Similar to the Grid Lines, the level indicator at the centre of the viewfinder helps align your shots for horizontal straightness. A broken line indicates that your photo isn't straight; it turns yellow when it is aligned correctly. It works for both portrait and landscape orientations, ensuring your photos are well-aligned.
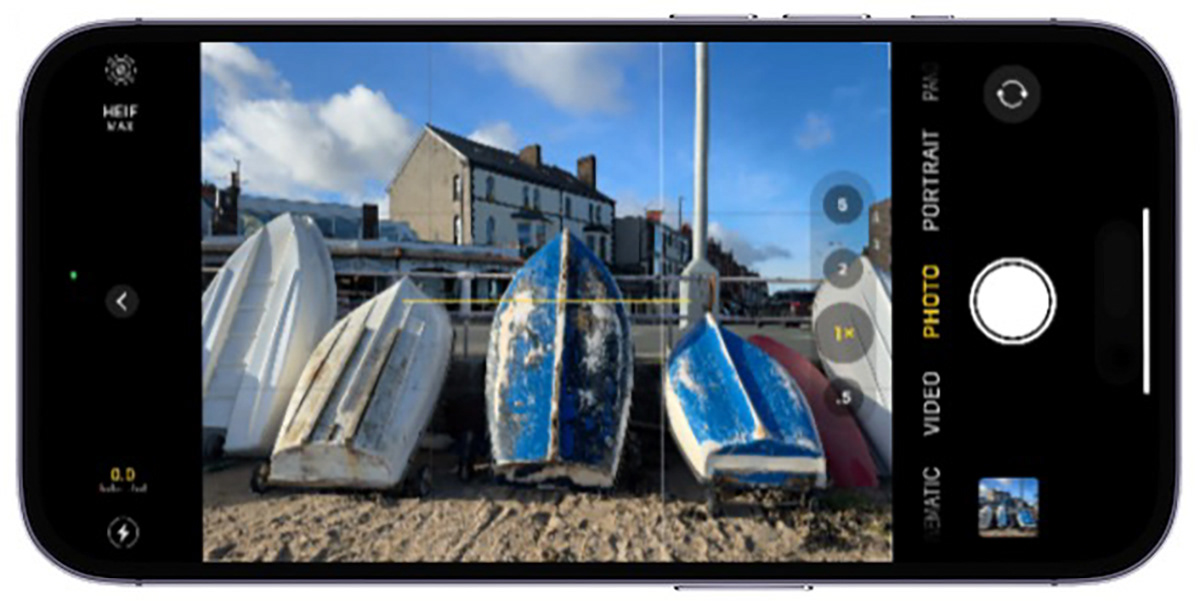
Add Grid Lines and Level (yellow centre line) to help keep your composition straight.
3. Quickly Access Camera.
Not missing the vital moment is all important in photography. Be ready to react and quickly access your camera even while iPhone is locked.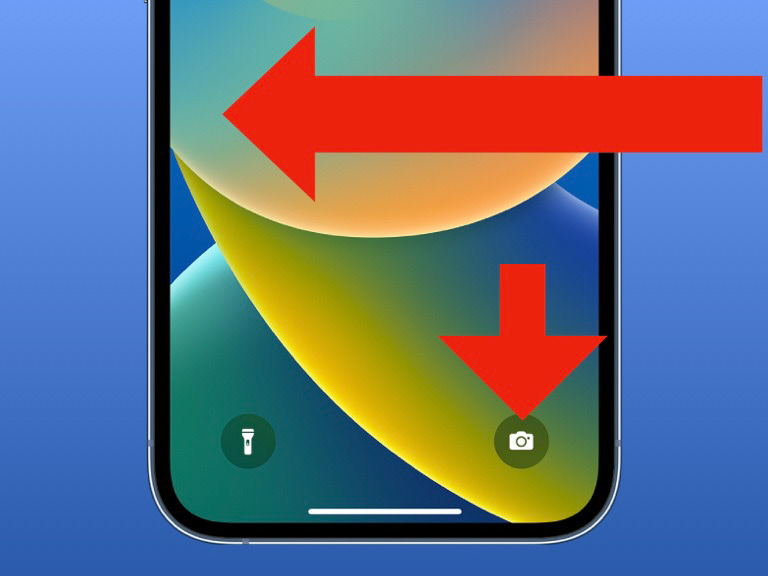
There are two shortcuts on the Lock screen to quickly open the camera.
If your Lock Screen includes a small Camera icon in the lower-right corner of the screen, you can long-press that icon to launch the camera app quickly.
Alternatively, and for me preferably, from the Lock Screen, place your finger on any part of the screen that doesn’t contain a notification and swipe to the left. If you swipe far enough, the Camera app will open instantly.
Get into these habits and you’ll be always be ready to capture that fleeting moment.
4. Avoid Pinch-to-Zoom.
Most smartphones come with optical and digital zoom features. Optical zoom, uses a dedicated lens, maintaining picture quality. Digital zoom happens when a camera goes beyond its lens limit, cropping the photo's edges to create a zoomed-in effect, often reducing the picture quality. And the more you digitally zoom, the more you lessen the quality of the image.
Although optical zoom is preferable to using digital zoom, the difference is between the two technologies is narrowing. The iPhone 15 Pro Max shows significant improvements in digital zoom.
5. Don't Use Built-in Flash.
While our smartphone cameras continue to significantly improve, their built-in flashes have serious drawbacks. Smartphone flashes are small and positioned near the lens, causing direct and harsh lighting that can lead to overexposed areas and strong shadows. You are never going to get evenly distributed light into a scene. It's generally better to use natural or ambient light when possible.
6. Think Different.
If you embrace a unique perspective, your photography will stand out more.
Experimentation with angles, focus, depth of field and reflections.
Experiment with different angles, lighting, depth-of-field, reflections, shadows, and even shooting through objects to make unique pictures that grab attention and evoke feelings. It's not enough to merely capture a picture; thinking differently in photography opens the door to innovative ideas, personal style, and the ability to tell compelling stories through images.
7. Experiment With Live Photos.
Live Photos turns a still photo into a short video with motion and sound. Most people use Live Photos to animate a scene, and that's fine but there is so much more that you can do.
Did you know that when you open the iPhone Camera app, it automatically begins taking pictures even if you don't tap the shutter button? This allows the phone to capture image data as quickly as possible. Those photos are automatically deleted if they're not needed without the user ever being aware of them. In the case of Live Photos, instead of just capturing photo information, the iPhone captures audio and video 1.5 seconds before and 1.5 seconds after you tap the shutter button.
Make sure Camera is set to Photo Mode and that Live Photo is turned on. You can turn Live Photos on and off by tapping the Live Photos icon at the top of the screen. Live Photos isn’t technically a “video” file format, each frame is saved as its own photograph meaning that you have much more visual information to work with than if you just tried pulling stills from a video.The Live Photo key image will show in the Photos app Library. Press and hold the image to view the whole moving image. You can change a Live Photo’s key frame, trim its length, mute the sound, and turn a Live Photo into a still photo from within the Photos app. Tap Edit, then do any of the following:
Set a different key photo: This is a great way to find the perfect moment in a Live Photos sequence. Move the white frame on the frame viewer, tap 'Make Key Photo', then tap 'Done'. Note: Live Photos taken on an iPhone 15 model with a portrait effect lose the portrait effect if you change the key photo.
Trim a Live Photo: Drag either end of the frame viewer to choose the frames the Live Photo plays.
Make a still photo: Tap the Live button at the top of the screen to turn off the Live feature. The Live Photo becomes a still of its key photo.
Mute a Live Photo: Tap the speaker button at the top of the screen. Tap again to unmute.
You can also add effects to Live Photos to turn them into fun videos.
Choose a Live Photo in your library. Tap the Live Photo button in the top-left corner, then choose one of the following:
Live: Applies the Live video playback feature.
Loop: Repeats the action in a continuous looping movie.
Bounce: Loops the action backward and forward continuously.
Long Exposure: Simulates a long exposure effect by blurring motion.
Live Off: Turns off the Live video playback feature or applied effect.
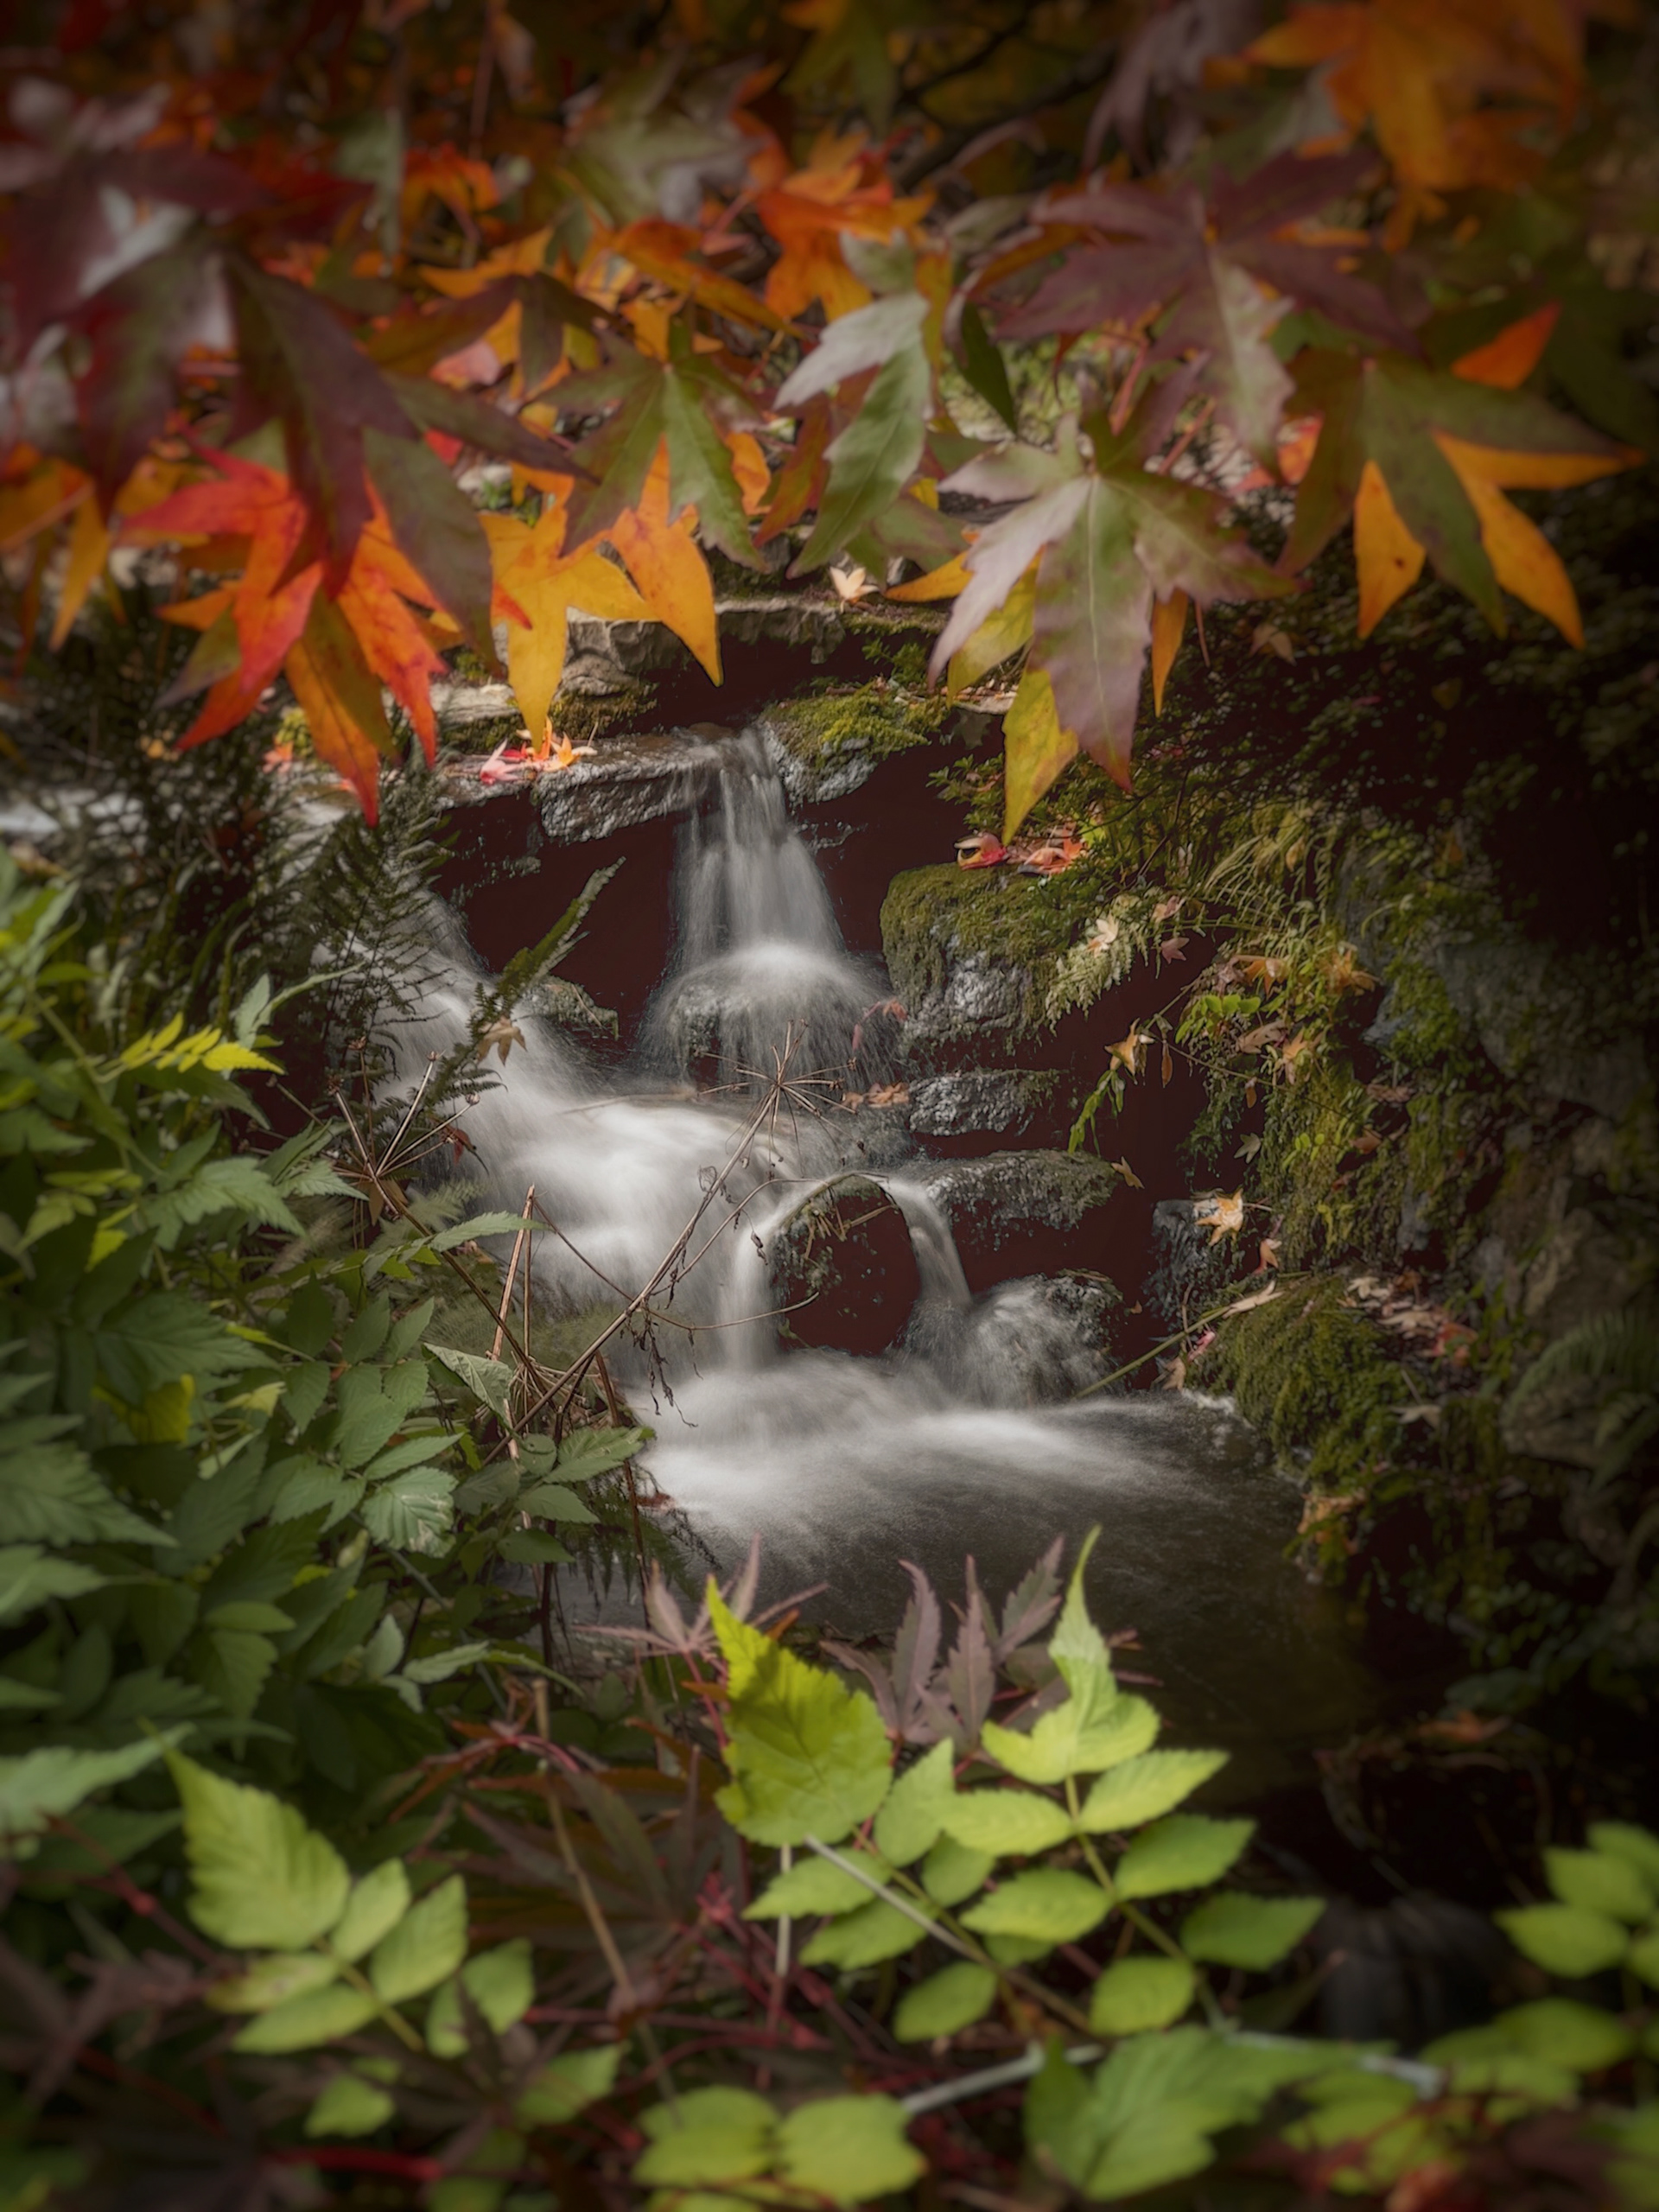
Long exposure photography is a simple way to add additional interest to your photos.
This is the easiest way to create a long exposure photo on your iPhone without purchasing a third-party app. Remember to keep the iPhone steady before and after you tap the Shutter Button. A tripod may make this easier. Each of the individual frames that were captured during the 3-second Live Photo are automatically merged to create a single frame where the motion is blurred. Note: A Live Photo long exposure will reduce the size of the image and the crop will change.
8. Explore Portrait Mode.
Portrait mode is a standout feature on the iPhone, keeping the subject sharp whilst beautifully blurring the background. This mode is available for use on people, pets, and even inanimate objects, depending on your iPhone model.
Portrait mode employs sophisticated software to create a blurred background effect in your photos.
To take a Portrait photo, open the Camera app and swipe to Portrait Mode. Tap the 1x or 2x etc button to switch between the zoom options.
Follow the on-screen tips, on-screen notifications let you know when you're too close, too far away or if the area is too dark. When Portrait mode is active, the name of the lighting effect, such as Natural Light, turns yellow.
After you've taken a photo in Portrait mode, you can adjust the level of background blur and the intensity of Portrait Lighting effects. Tap a Portrait Mode photo in your library.
Tap 'Edit', then tap the 'Depth Control' button at the top of the screen to adjust the background blur. A slider appears below the photo. Drag the slider left or right to adjust the effect. A grey dot above the slider marks the original value for the photo.
Tap Done.
Tap 'Edit', then tap the 'Depth Control' button at the top of the screen to adjust the background blur. A slider appears below the photo. Drag the slider left or right to adjust the effect. A grey dot above the slider marks the original value for the photo.
Tap Done.
There are options to change the lighting on your subject. There are six Portrait Lighting effects:
Natural Light: On by default and, keeps the lighting as captured.
Studio Light: Brightens the subject.
Contour Light: Makes shadows and highlights look more dramatic.
Stage Light: Removes the background and adds a black one.
Stage Light Mono: Is the same as Stage Light -- just in black and white.
High Key Mono: Turns your subject to grayscale and changes the background to white.
Available on portraits taken on iPhone 13 models and later, with iOS 16 or later, you can tap on an area of the image to change the subject focus. When you select a new subject, the blur automatically adjusts so the new subject appears sharp and in focus. Make sure that the new subject isn’t blurred or too far in the distance.
On iPhones 15 and 15 Pro, you can apply Portrait mode effects to photos taken in the standard camera mode after capturing them. If the face of a human, a dog, or a cat, is detected, then depth information is captured even if you are not in Portrait Mode.
9. Capture close-up detail with Macro shots.
The iPhone can take stunning macro photos. You can get in super close and capture incredible detail in the subject, details that otherwise might go unnoticed by the naked eye.

Reveal a different perspective on the intricate and often overlooked miniature world.
In addition to capturing macro photos, you have the option to create macro Live Photos, Macro Slow-motion, and Time-lapse videos. The process is straightforward – just launch the camera, maintain a steady hold on your iPhone, move-in close to your subject, and capture the shot.
Move around the subject, taking photos to find the best angle. You'll be surprised how much difference the angle of the light makes to the final photo. Adjusting your viewpoint can also help eliminate unwanted reflections or shadows from the image.
10. Shoot In The Dark.
If you haven't tried night photography with your smartphone, now is the time to consider it. iPhone low-light photography has improved significantly in recent years, and the latest models come with Night Mode that can capture stunning, bright images even in the darkest locations.

Smartphones’ low-light capabilities have improved over the years, allowing them to capture better images in darker conditions.
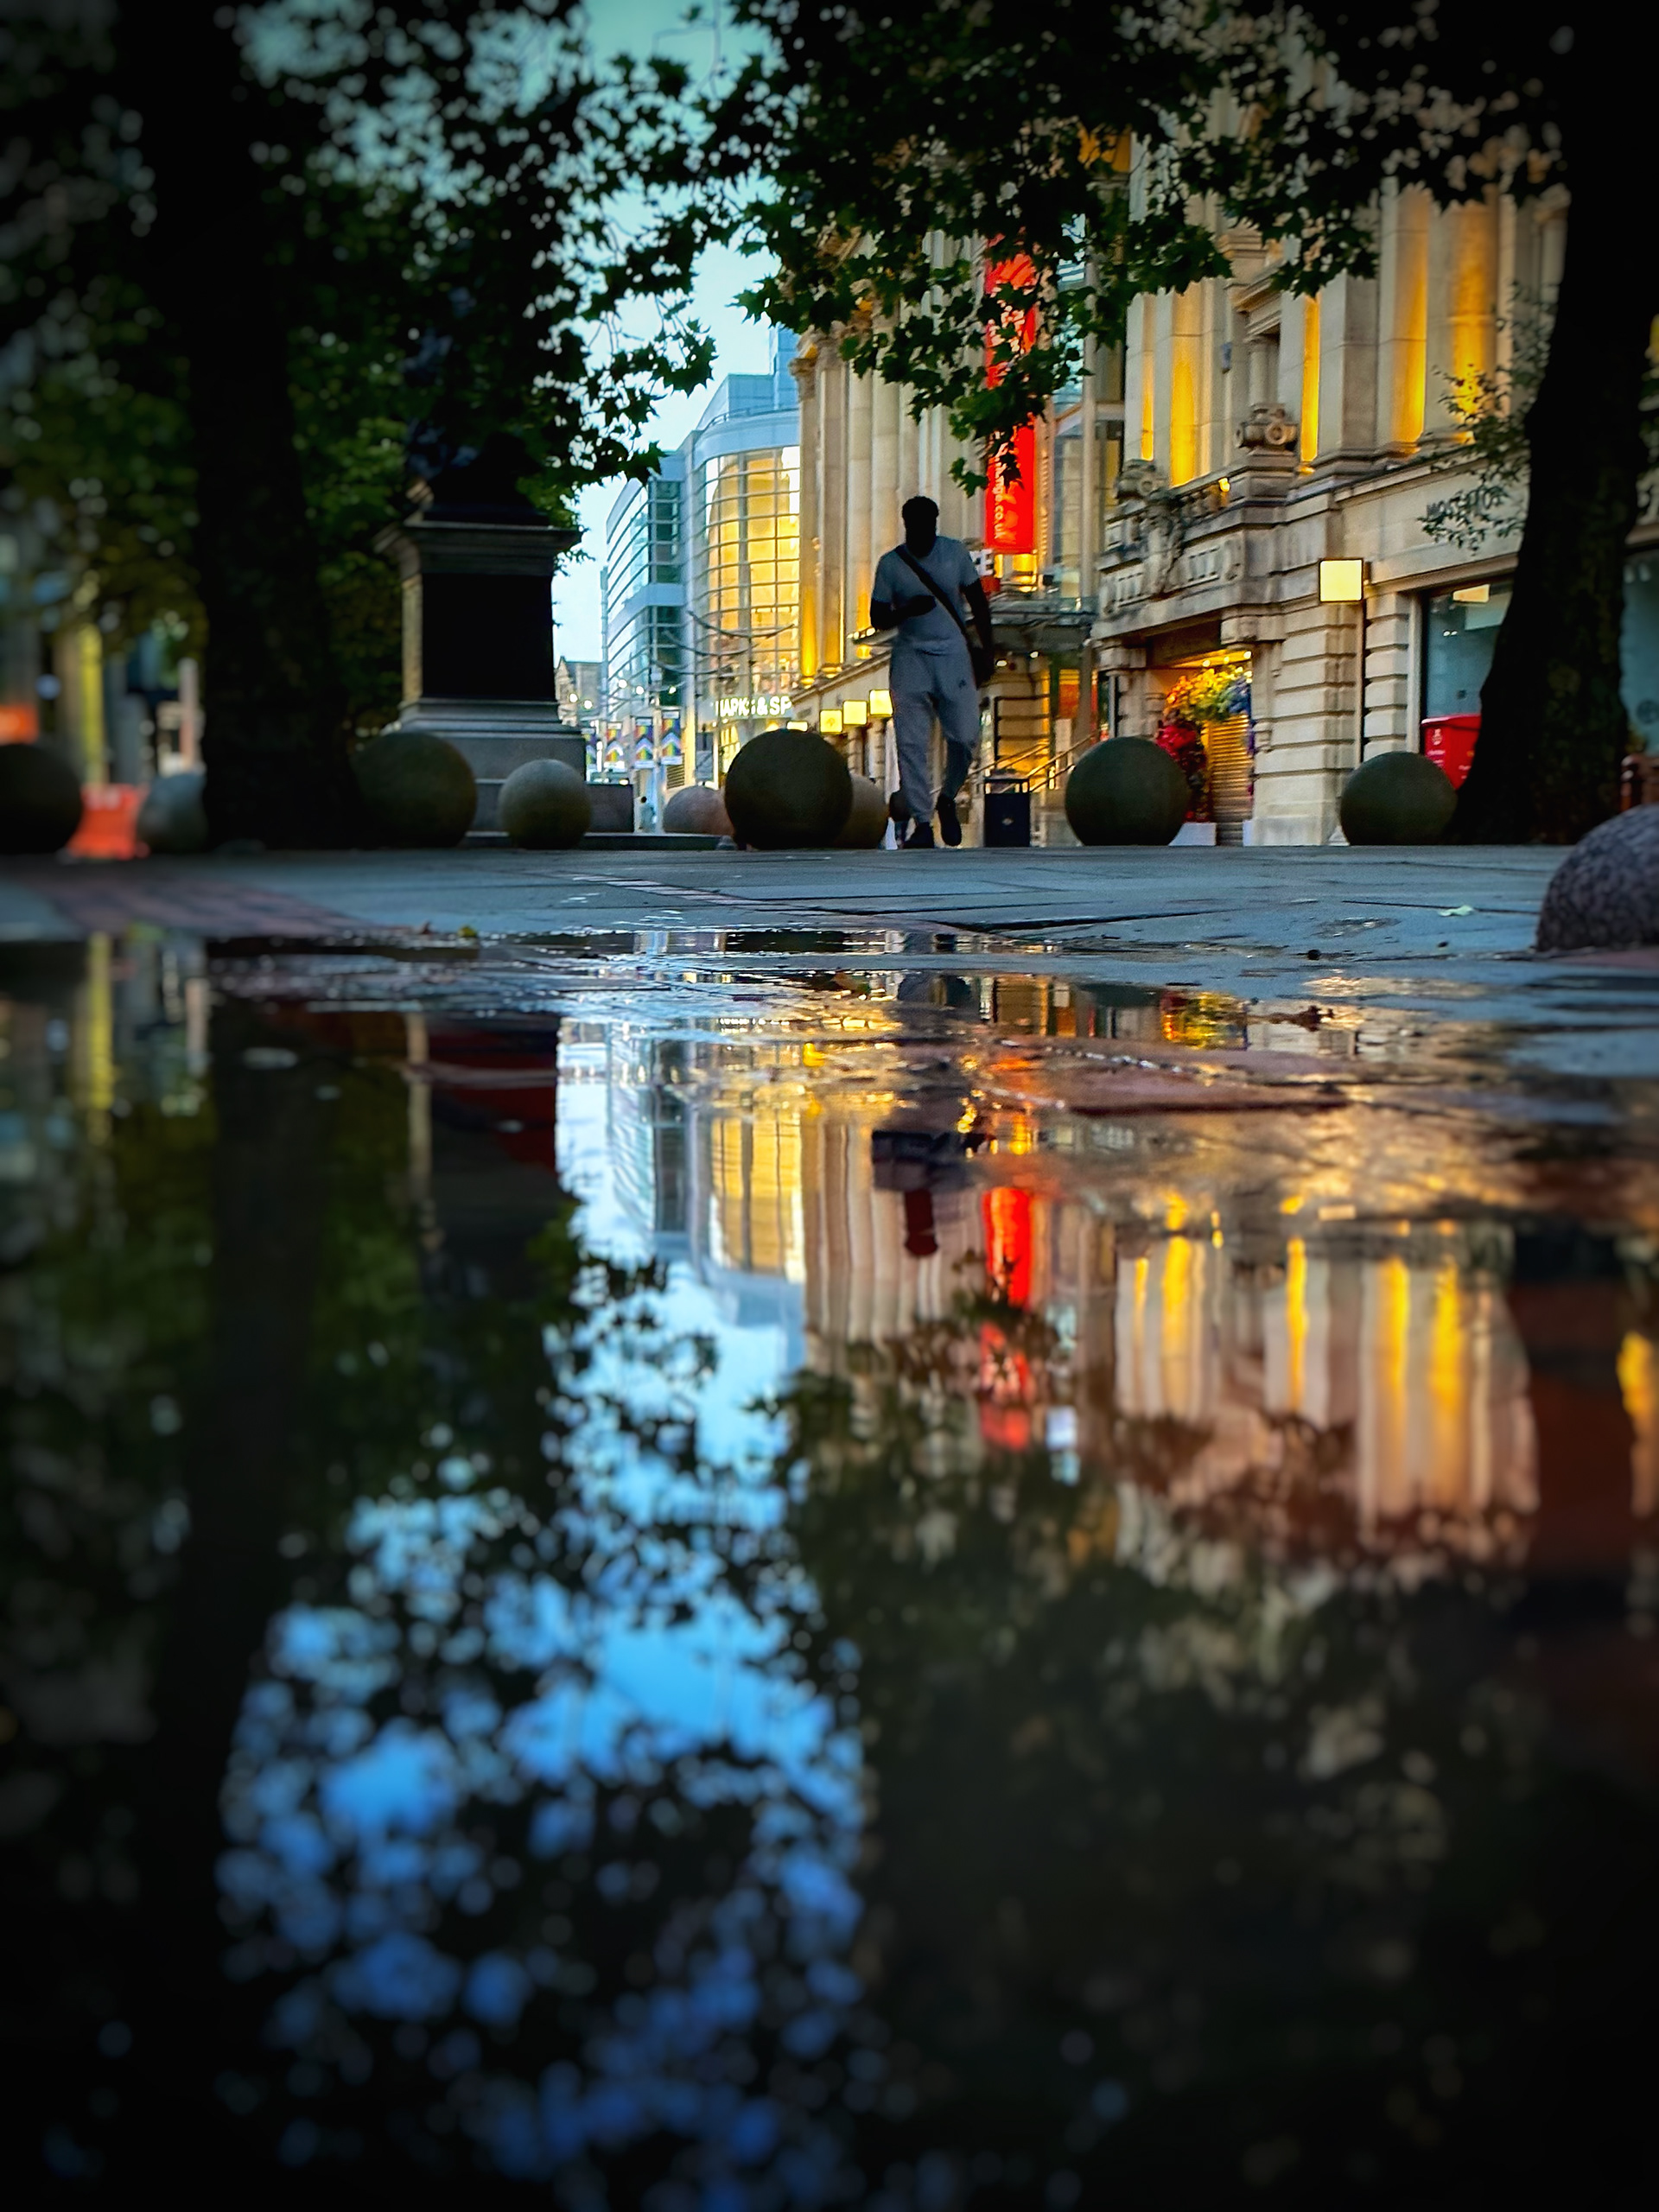
Photography at night comes with its perks. Busy places during the day often become serene and take on a different charm after the crowds have gone. Additionally, the darkness can transform ordinary scenes into something magical. Places that might seem mundane in daylight can undergo a dramatic change at night, with the lights offering an opportunity to capture new and exciting images.
The golden hour, just after sunrise and before sunset, bathes surroundings in warm, soft light—perfect for various types of photography. The blue hour, during twilight before sunrise and after sunset, creates a cool-toned atmosphere, especially suitable for cityscapes and scenes with artificial lighting. Both periods provide favorable lighting conditions, enhancing the visual appeal of images.
In conclusion, simply relying on our smartphone camera for quick snapshots limits the depth and richness we can extract from our photography. To unlock the full potential of our creative expression, it's important to delve into the capabilities of our device, embracing the versatility they offer beyond the constraints of casual, point-and-shoot practices.
I wish you happy photo taking.
Further reading: